|
How to
apply boat lettering.
Print
these instructions and keep them at your side when doing the installation.
|
INSTRUCTIONS:
Applying your vinyl graphics is simple if you follow some basic
guidelines. The boat names generally come in one piece and are
sandwiched between a paper layer of transfer tape and a wax layer
of backing.
You will need only a few things to accomplish this feat.
1.
Mildly soapy water in a
spray bottle or mister. Three or four
drops per quart.
2.
A hard squeegee, or piece of hard plastic.
3.
An Exacto blade.
4.
A tape measure
Vinyl should never be applied in temperatures less than 40 degrees
Fahrenheit or 4 degrees Celsius. Also the lettering surface should
be free of dirt and wax for best results.
|
- Temporarily tape name to boat.

- To get the name to go up straight, start with a piece of
tape on one corner. With the backing still on the graphics slap it up there
where you think it should go. Go ahead! You can always move it
if you don't like the position.

- Bring the other side into position and tack it down with
another piece of tape. Use a tape measure to be sure it is
level. If you have a straight edge on the paper backing to
measure to, great! If not, measure from the edges of similar
letters. Remember that some letters (like O's and S's)
normally sink below the line of text.
- If you're lettering both sides of the vessel, pick a piece
of hardware common to both port and starboard as a reference
point BEFORE you begin. You'll really want to double check
position of both sides before adhering either! Sometimes one
side of the boat surprises you with a drain or a mystery
window.

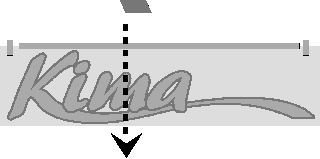
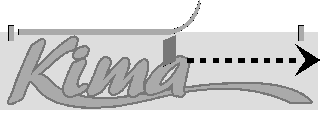
- "Hinge" the graphic along one of the straight
edges with a long piece of tape. Half the tape should be on the
transfer paper and half on the boat.

- Now when you flip the graphic back to remove the wax paper,
everything stays in place. Test it! Make sure it's not getting
loose on you! If you can't flip it back because you're on a
curved surface, cut between the letters. See the diagram in
step six below.

- Peel back the wax paper and expose the sticky side of the
vinyl. Big long names sometimes call for a helper at this
point, but if you have a name that can be divided into smaller
sections, cut between the letters so that you're dealing with
a more manageable piece of vinyl.
Separating the letters after hinging is also very helpful when
lettering on curves surfaces...each letter needs to fall
differently and cutting between them will assure that you
steer clear from leveling problems.

- Many times it's easier to smooth out the name if you mist
the adhesive backing with a little soapy water. Wetting it
also prevents it from sticking immediately and the soap makes
"the water wetter." Usually a wet application is
good, then again, if it's too soapy and doesn't stick at all,
you have to rinse some of that soap off with fresh water.
Generally, use the wet application as it's easier to squeegee
out water bubbles than it is to squeeze out air bubbles. When
all the water evaporates out from under the name in a few
days, the vinyl will adhere as if it were going up dry to
start. If you're one of those daring pros, you'll start with a
dry application because you know it's going to stick better
right away.
- Lay the vinyl close to the hull. It won't stick if you've
wet it down, especially if you don't press it too hard. It's
called "pressure sensitive" vinyl which means that
the harder it is pressed, the harder it sticks. Holding the
free edge tautly, just off the surface , pull the squeegee
across the center of the graphic to get a good center line of
adhesion.
- Now you can lift one of the sides up and squeegee from the
center line toward the edges. ALWAYS work from the center
toward the edges!! Do this to avoid trapping air or water
bubbles.

- Finish off the other half the same way (from the center to
the edges, then from the middle to the top and bottom). If you
started with a good centerline, the rest of the vinyl will
fall into place, naturally!

-
Finish by spraying down the transfer tape
with that spray bottle. Squeegee a little more for good
measure and let that water soak into the paper. The water not
only helps you apply the vinyl smoothly, it also loosens the
paper and helps to remove it without pulling the vinyl back
off the boat. Pop any bubbles with a pin point and press out
the air or water. Any water bubbles will evaporate.
Congratulations!
|
AMA, Inc. agrees to correct by
replacement at our own expense at our option, any defects in the
product which is due to AMA, Inc. fault or negligence. AMA, Inc.
shall have the right to inspect the product prior to making any
decision on such defects. When inspection proves the claim, and
provided that the product was properly cared for, AMA, Inc. will
fulfill all obligations to the purchaser to correct such
defects.
AMA, Inc. does not cover claims of damage caused during
shipment, improper installation, use in extreme conditions, and
improper care of graphics.
|
|